By Emily Dawson, Food Blogger, Recipe Developer, Photographer
200+ recipes developed and tested in her home kitchen before publishing on British Kitchen Hub.
Reviewed against our editorial standards.
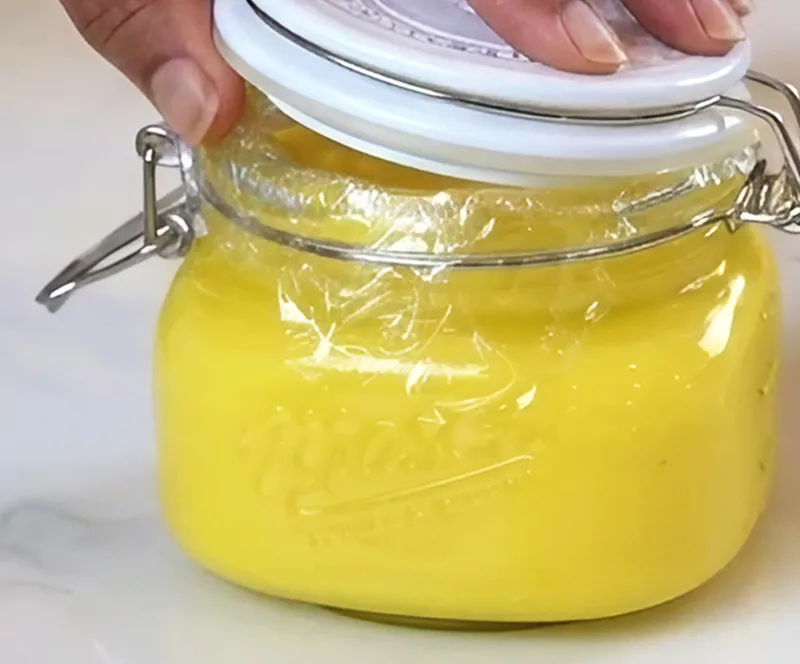
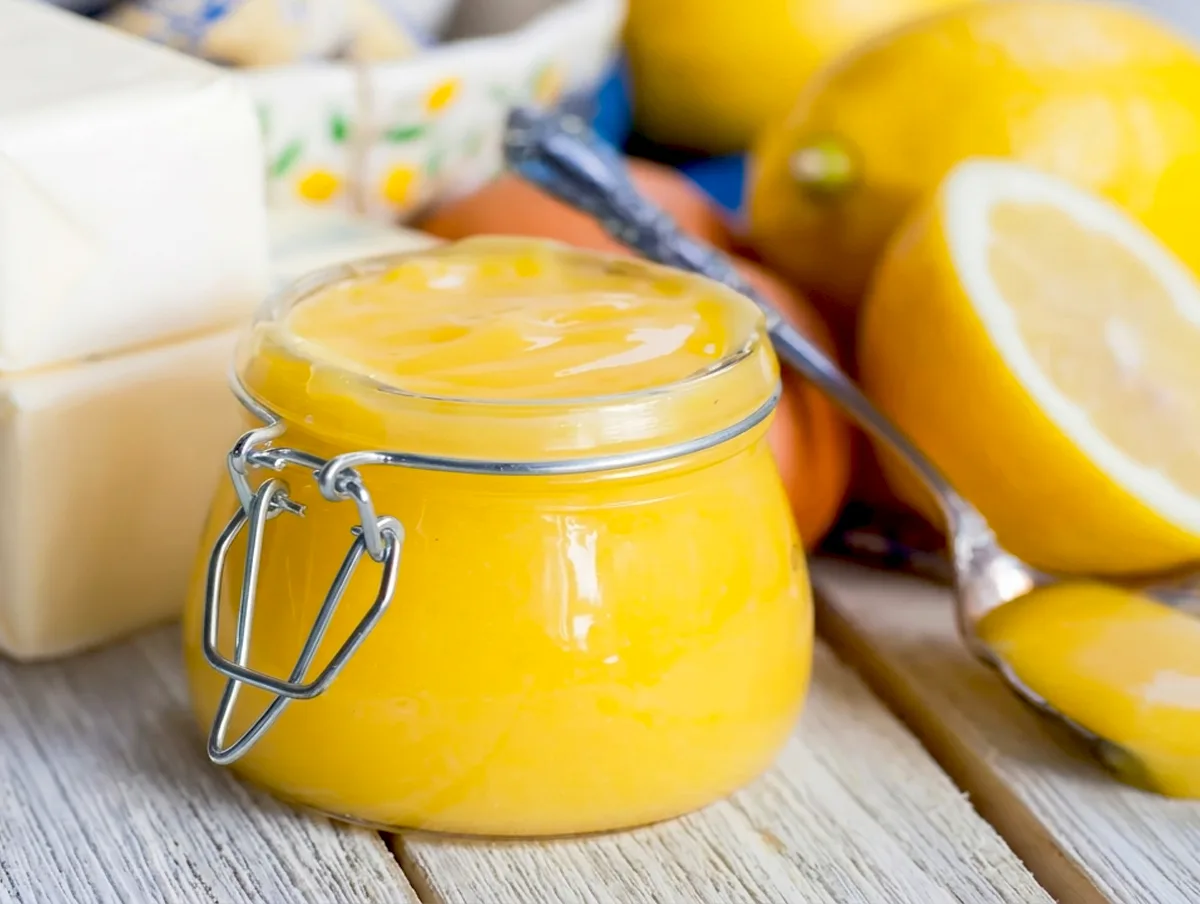
Best Homemade Lemon Curd Recipe
Best Homemade Lemon Curd Recipe While supermarket lemon curd is made with a fraction of how much lemon juice this homemade version uses and thickeners (modified starch and pectin) that turn it from silky to slightly gluey in texture. This best-ever recipe for DIY lemon curd makes the ultimate sharp-tasting, intensely flavoured stuff on the planet! You will need the juice of 3 massive unwaxed lemons and the zest from all three, ideally. The zest goes in first, steeped with the sugar so that lemon oils infuse into it instead of evaporating away as they cook. As a result, recipes using whole eggs provide a deeper yellow color and creamier texture than those made with only yolks. The butter is added off the heat in small squares, stirring one piece at a time to prevent the curd from splitting and ensure the emulsion runs smoothly. It is done in a regular pot on medium-low heat for 15 minutes. No double boiler. No thermometer. You know the curd is finished when it coats the back of a wooden spoon, and if you draw your finger through it, clean lines hold on either side. This will last in the fridge for 3 weeks.

Prep
5 mins
Cook
10 mins
Servings
Makes 300ml
Difficulty
Easy
Best Homemade Lemon Curd Recipe
Store-bought lemon curd uses a fraction of the amount of juice in lemons that you need for proper homemade curd. Go have a look at the ingredient list of a jar, and you will find modified starch and pectin (a gelling additive derived from fruit) as well as approximately 6 to 8% lemon juice. This recipe calls for approximately 120 ml, the juice of roughly 3 large lemons. There is a big difference in flavour and experience.
The texture is different too. The increase in gum from the water versions leaves a small gluey quality in commercial curd. The texture of homemade curd, made with eggs and butter, is silky fluid, and it coats a spoon instead of perching on it in an adorable little mound. The latter is more golden-hued. Four whole eggs rather than just yolks yield a yellow that comes from the egg itself and butter, not any added colouring.
Two things that are typically wrong in 99% of lemon curd recipes. The first is skipping out on the zesting step. The sharp, aromatic flavour of lemons with a distinct 'lemon' taste that hits the back of your throat rather than just being sour is present in lemon zest because it contains more essential oils than any other part. Those oils are released directly into the sugar by rubbing the zest in before anything else hits that pan, and they work their way through to season your finished curd. Miss out this step and the curd tastes of lemon juice. Do it, and it tastes of lemon.
Second mistake is adding the butter too early. However, if it goes into the warm curd when it's still over heat -- separates: you get a greasy film floating on top and underneath that, earnestly grainy. Remove from the heat entirely and whisk in cold butter cut into small cubes, one at a time, stirring until each piece of butter has disappeared before adding another. Then the emulsion is stabilised and the maximum smoothness of the structure
No double boiler needed. Fine for someone paying attention on a medium-low heat with just a regular saucepan. The curd is then set and ready at around 82°C without the need for a thermometer. It is done when it coats the back of a wooden spoon thickly and leaves clean edges in the path created with your finger, where no curd spills across.
Variations
- Lime curd: replace the lemon juice and zest with the same quantities from about 5 limes. Lime curd is sharper and slightly more bitter.
- Orange curd: use the juice of 2 large oranges (about 120ml) and the zest of 1 orange. Add 1 tablespoon of lemon juice to bring back the sharpness that orange alone lacks. The result is sweeter and more rounded than lemon curd.
How to Make Best Homemade Lemon Curd Recipe (Step-by-Step)

Rub the zest into the sugar before anything else
Lemon zest holds the essential oils that give lemon its sharp, aromatic quality – the flavor that's distinctly lemon rather than just sour. Those oils are volatile: they cook off quickly in heat and dissolve poorly in liquid. Rubbing the zest into dry sugar before the eggs or juice go in breaks the zest cells and releases the oils directly into the sugar granules, which then carry that flavor through the whole curd as it cooks. Take a minute to do this properly, and the sugar should look slightly damp and yellow, and the smell should be noticeably more intense than fresh zest on its own. Skip this step and you'll make lemon-flavored curd. Do it and you'll make lemon curd.
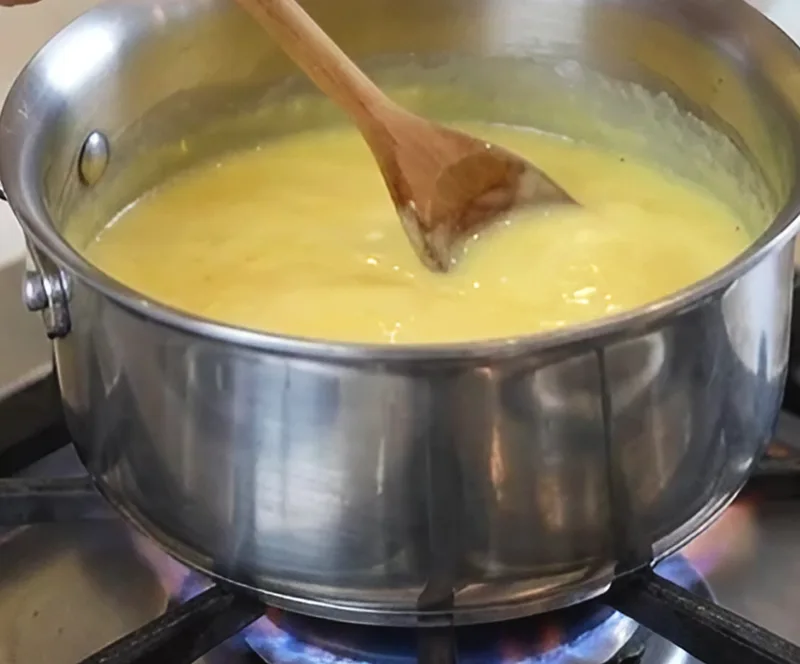
Cook over medium-low heat and keep stirring
At a foundational level, lemon curd is nothing more than an egg custard patterned after the way you would know how to cook eggs on your stovetop plus some of lemons and butter. The same motto as the custard. Low flames and constant stirring. Egg white threads floating in a thin, watery liquid are not what you want. This is scrambled eggs set too fast by high heat. For most jobs (3 to 4 of a maximum). In the first 5 minutes, your curd will appear thin and liquidy. It is noticeably thick around 7 minutes, and stirring will feel more resistant. In 8 to 10 minutes you can coat the spoon. Do not crank the heat to turn this into a speed exercise and do not walk away from it.
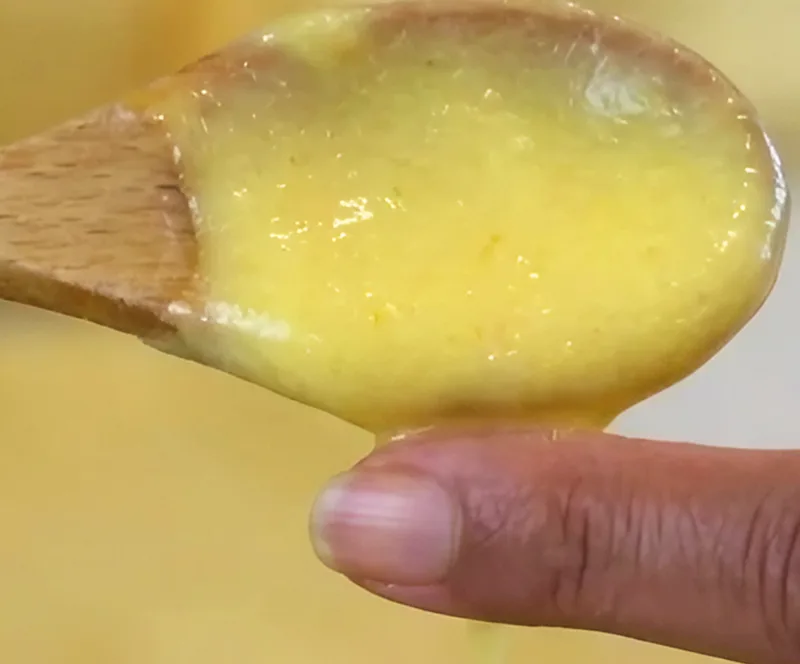
The finger-line test is more reliable than a timer
Each hob gives off varying types of temps, and each pan transfers heat differently. A timer does tell you when 10 mins are up, but the finger-line test tells you whether the curd is really done yet. Using a wooden spoon to dip the curd and hold it parallel. The curd must coat it with a layer thick enough to remain there without running off. With that coating, draw your finger in a line downwards; the line should retain its form without feathers. Another minute if the curd runs back across your line. The curd is ready if you get the line, so remove from the heat immediately. Egg proteins contract too much and cause the curd to become grainy when it is overcooked.
Add the butter off the heat, one piece at a time
This is the step where lemon curd goes awry most frequently, because you are working with butter. When you put butter in hot milk and the milk is still on the hob, it can break itself. This means that this fat separates out of its emulsion, so what do you get? The solution is simple: remove the pan from heat completely before any butter enters and add it cold, in little pieces, one or two at a time. Keep stirring in each piece until it has all melted through and the curd is smooth once more before adding another batch. This also helps in getting the temperature of the curd down fast and prevents you overcooking your eggs. The complete addition of butter takes around 2 minutes. When the last chunk has been incorporated, it should be shiny, smooth and thick enough to fall from the spoon in a slow ribbon.
5 from 1 vote
Best Homemade Lemon Curd Recipe
While supermarket lemon curd is made with a fraction of how much lemon juice this homemade version uses and thickeners (modified starch and pectin) that turn it from silky to slightly gluey in texture. This best-ever recipe for DIY lemon curd makes the ultimate sharp-tasting, intensely flavoured stuff on the planet! You will need the juice of 3 massive unwaxed lemons and the zest from all three, ideally. The zest goes in first, steeped with the sugar so that lemon oils infuse into it instead of evaporating away as they cook. As a result, recipes using whole eggs provide a deeper yellow color and creamier texture than those made with only yolks. The butter is added off the heat in small squares, stirring one piece at a time to prevent the curd from splitting and ensure the emulsion runs smoothly. It is done in a regular pot on medium-low heat for 15 minutes. No double boiler. No thermometer. You know the curd is finished when it coats the back of a wooden spoon, and if you draw your finger through it, clean lines hold on either side. This will last in the fridge for 3 weeks.
Equipment
- Medium saucepan
- Wooden spoon or silicone spatula
- Fine grater or microplane (for zesting)
- Citrus squeezer
- Fine mesh sieve
- Kitchen scales
- 2 x 150ml sterilised glass jars with lids
- Heatproof jug (optional, for pouring into jars)
Save this recipe!
Get this sent to your inbox, plus get new recipes from us every week.
Ingredients
Instructions
- Zest all 3 lemons straight into the saucepan. Add the caster sugar. With your fingertips, rub the zest into the sugar for 1 minute until it resembles wet sand and smells aggressively of lemon. This helps to release the oils from the zest into the sugar, and it makes a noticeable difference in the flavor of the baked good at the end.
- Strain the lemon juice through a fine sieve into a jug to catch any seeds and pith. You need approximately 120ml. Use 4 if your lemons are tiny. Add the 4 eggs to the saucepan with lemon sugar and whisk just until combined. No need for foamy eggs; just combine.
- Add the strained juice of the lemon to this mixture and mix it well. Start on medium-low heat and stir with a wooden spoon or spatula constantly for 8 to 10 minutes. Set the heat to medium, since if it gets too hot, eggs scramble. Stir towards the edges of the pan and continue moving the mixture.
- The curd is done when it coats the back of your spoon with a layer that sits on there without sliding off if you hold it horizontally. Draw your finger through the coating on the back of a spoon, and it should leave clean edges without any curd running back across. At this stage, immediately take the pan off heat.
- Stir in 1 or 2 cubes of cold butter at a time, mixing well each addition until the butter is melted and fully incorporated before adding another one. This adds a total of ~ 2 minutes. The key to a silky curd is to add it off the heat, piece by piece adding it all at once or while still in contact with the heat makes it greasy.
- If you would like a curd that is perfectly smooth and does not contain any pieces of zest, strain it through a very fine mesh sieve into the jug by pressing against it with the back of the spoon. This step is unnecessary if you don't mind a textured curd; the zest gives little flecks of flavor. Transfer it to sterilised jars, seal and allow it to cool at room temperature. As the curd cools, it also gets thicker. Store it in a fridge once cool and use it within three weeks.
Frequently Asked Questions
How long does homemade lemon curd keep?
In sealed sterilised jars, it keeps in the fridge for up to 3 weeks. It is so high in sugars, acids and fat that it keeps well. If it smells like fermentation, hooch or water or is visibly mouldy, discard it. Homemade lemon curd does not have a long shelf life when opened (even at room temperature) always refrigerate after opening.
Can I freeze lemon curd?
Yes. Now transfer the chilled curd into containers that can be placed in a freezer; ensure the top is left about 1 cm from the lid, and seal and freeze for up to three months. Thaw overnight in the fridge and stir well before use. It may appear a little more separated after thawing but will come back together with stirring. The texture is slightly less velvety than fresh curd, but the taste remains unchanged.
Why has my lemon curd gone grainy or lumpy?
The heat was too high, and the eggs began to scramble. If it is only a little bit grainy, run this through the finest sieve you have while still warm. All of the butter solids get stuck on top, and most likely your curd underneath will be okay. If very grainy throughout, the eggs are far too set to be saved. Knead again over a lower fire, stirring continuously.
Can I use bottled lemon juice instead of fresh?
Formally, yes, but it is of noticeably lower quality. What this means is that bottled lemon juice has none of the volatile aromatic compounds found in fresh juice (and zest) and may have a subtle metallic aftertaste, which raises its ugly head when using it as the primary flavoring ingredient. You are better off using fresh lemons here.
Notes
Unwaxed lemons, why it matters
Waxed lemons have a thin coating of food-grade wax applied to extend shelf life. The wax isn't harmful, but it doesn't wash off completely with cold water and it ends up in the zest, which ends up in the curd. Unwaxed lemons are sold in most supermarkets, usually labelled clearly, and are worth using in any recipe where you're using the zest. If you can only find waxed lemons, scrub them under hot water with a vegetable brush for 30 seconds before zesting.
Nutrition
Calories: 72 kcal | Carbohydrates: 9 g | Protein: 1 g | Fat: 4 g | Saturated Fat: 2 g | Sugar: 9 g | Fibre: 0 g | Sodium: 10 mg
Nutrition information is automatically calculated and should only be used as an approximation.
Like this? Leave a comment below!

Now Available!
Get my most popular bakery-style cookie recipes in one beautiful ebook. Foolproof recipes and bakery-worthy cookies you can make at home.